Decorative Wood Poles Are "Decorative"
All real wood products may contain slight imprefections that are naturally inherent in real wood. Wood drapery poles may have a slight bow, and that's not considered a defect.
You may need to apply a fine wax to your drapery pole so your rings will slide smoothly. Decorative wood poles are meant to be "decorative", so you may need to make adjustments to maximize functionality.
Kirsch Drapery Hardware Is Easy To Hang And Adjust
Getting you Kirsch wooden drapery hardware or metal curtain rods onto your window is a really easy process. Most all brackets for drapery poles and curtain rods install (or hang) using the easy anchor plate system. Since you can use splices and wood pole connector screws to extend your drapery pole, you can quicly create the perfect drapery hardware treatment for your window. This flexible installation system allows for easy adjustments in the future.
Drapery Pole Brackets Install Easily With Plates & Templates

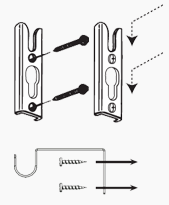
Most all drapery pole and metal curtain rod brackets use a keyhole plate like the one one pictured here. Kirsch drapery hardware & Select both offer this style. Depending on the size and diameter of your wooden drapery pole or curtain rod, the size and shape of the keyhole plate may change, but the basic functionality will remain the same.
Use the keyhole plate as a template to mark your screw holes. Install the keyhole plate to the wall and slide the bracket over the plate. Adjust the screws on the back of the bracket to ensure a tight fit. And, basically, that's all there is to hanging you wood drapery pole or metal curtain rod.
Some drapery poles have brackets that mount directly to the wall or window frame without the use of keyhole plates. These drapery poles are typically smaller in diameter.
Use Several Drapery Poles Or Metal Rods To Cover Large Widths

Most drapery rods and metal curtain poles come in pre-defined lengths like 4 foot, 6 foot, 8 foot, 12 foot and 16 foot. To get a drapery pole the exact size of your window, you'll probably need cut your pole down to size or join more than one pole together.
Even though most all metal curtain rods and drapery poles are available in 12 foot long sections, it's usually impractical to get a 12 foot drapery pole sent to your home. The long size forces such a pole to be shipped on a semi-truck, and the cost is usually very high. So, unless you can find a 12 foot drapery pole at a local store, you'll need to use either a wood pole connector screw or a metal pole splice to join more than one smaller drapery poles together to reach your desired length.
When you join multiple drapery poles together, you need to add an extra bracket (or center support) where the two pole sections meet to prevent bowing.
Hinged Elbows For Drapery Poles Create Bay Or Corner Styles

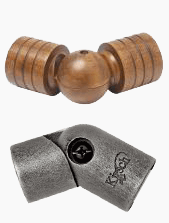
If you're using a wooden drapery rod to create your drapery hardware treatment, you can always carefully miter the end of each pole to create a custom bay or corner rod. Or, to simplify your installation, you can use a hinged drapery pole elbow that will easily adjust to the proper angle.
Drapery pole elbows are available for many Kirsch drapery hardware treatments. These handy accessories make hanging your complex window treatment very easy. Simply slide the end of your drapery pole or curtain rod into the socket of the elbow and adjust the angle.
It's very important that you carefully install brackets close to the pivot point to ensure the rods or poles stay where you want them to be.
When it comes to hanging Kirsch drapery hardware, the key to success is careful planning before the installation. While it's easy to find a professional drapery installer in your area, many home owners decide to hang their window treatments themselves. To make sure that your installation goes smoothly, you should make a plan before you select your drapery hardware components to ensure that they will work properly on your window. By following a few easy steps before you buy your hardware, you'll ensure a smooth and easy installation.
Examine your window carefully and decide exactly where you'll need to hang your brackets. If your window width is greater than eight feet, you'll probably need to use a center support bracket on your drapery pole. And, you'll obviously need brackets on each end of the rod as well. The three most common mounting positions for brackets are - on the wall and to the left and right of the window, on the ceiling above the window, or inside the window frame. For on the wall installations, you'll need standard brackets. If you're hanging the rod from the ceiling, you'll need to find ceiling mount brackets. And, for inside the window frame, you may want to use inside mount sockets. When you start searching for drapery hardware, make sure that the collection you purchase has the correct bracket options for your window.
Most drapery rod brackets come with installation screws. However, that doesn't mean you should use them! Examine the surface that you're going to install your drapery bracket on. If you're mounting brackets onto wood trim, you should use wood screws. You'll also want to use wood screws if you're surface is drywall with a header or wood stud behind. Metal screws should be used if your installing onto a metal door or into the metal casing around the window. For installing brackets into drywall with no supporting studs, use hollow-wall anchors or molly bolts to ensure that the bracket has adequate support. Drapery hardware manufacturers don't know the specifics of your particular installation and the screws provided are usually just a standard screw that may not be appropriate for your situation. You can find all of the above mentioned alternative screw types at your local hardware or home improvement store.
If you're joining two smaller poles together to reach a longer width, like using two six foot poles to cover a twelve foot window, you're going to need to use a pole joiner. If you use a pole joiner, you must use a support at the point where the two poles meet. If you don't, your drapery rod will begin to bow or sag over time. The joiner holds to two poles together, but it doesn't offer enough support to stabilize the rod. Make sure that you have adequate space to hang the center support before you decide to buy two poles to cover your window.
By examining your window and developing a plan for hanging your drapery rod before you buy your decorative hardware, you can quickly find the perfect collection that offers all of the components you'll need to complete your window treatment. When you know ahead of time to proper type of screws and mounting hardware you need, you'll installation will go smoothly and your treatment will remain stable for years to come.
©2024, Designer Drapery Hardware, LLC


